Are you looking forward to exploring your design possibilities using Font Awesome Pro in Beaver Builder? These two tools can help you take your WordPress website to the next level. However, you might not know how to integrate them on your site.
Fortunately, these premium tools are highly compatible, and integrating them is straightforward. All you need is a bit of guidance to properly enable Font Awesome Pro icons and icon sets in Beaver Builder.
In this post, Beaver Builder’s own Anthony Tran introduces you to the Beaver Builder plugin, and gives an overview of Font Awesome’s Pro Icon Sets. Finally, he’ll show you how to set up Font Awesome Pro in Beaver Builder. Let’s get started!
An Introduction to Beaver Builder
As you may already know, Beaver Builder is a popular WordPress page builder plugin. With this tool, WordPress beginners can easily build websites using an intuitive, drag-and-drop builder:

Beaver Builder’s user-friendly interface lets you modify almost every design element on your website on the front end. You can alter global settings, employ custom fonts, and create layouts in a highly straightforward fashion.
At the same time, the tool is also developer-friendly, allowing for more advanced modifications using HTML, CSS, PHP, and JavaScript. However, with Beaver Builder, you won’t need to touch a line of code if you don’t want to.
If you’re happy with the Beaver Builder plugin, you might also be interested in its Beaver Builder Theme and Beaver Themer add-on. These tools expand the plugin’s functionality and help you make larger design changes to your site. In a nutshell, Beaver Builder enables WordPress users of every level to create beautiful and unique websites with less hassle.
Font Awesome Pro Icon Sets for Beaver Builder
If you’re looking for expanded (yet subtle) customization options, using Font Awesome Pro icons with Beaver Builder can significantly enhance your web design potential. When you enable the Font Awesome Pro integration in Beaver Builder, you get access to a whole suite of icon sets and Kits, which you can insert into your WordPress posts and pages.
In addition to the Font Awesome Free styles, which include Solid, Regular, and Brands, Pro users also get access to Light and Duotone styles. Not only that, but Beaver Builder works with the latest and greatest, Font Awesome 6, which also includes the all-new Thin style:

These comprehensive styles can accommodate the look and feel of any website. You might want to use Light or Thin designs for a more subtle touch. Alternatively, you can utilize Solid icons for a bolder design:
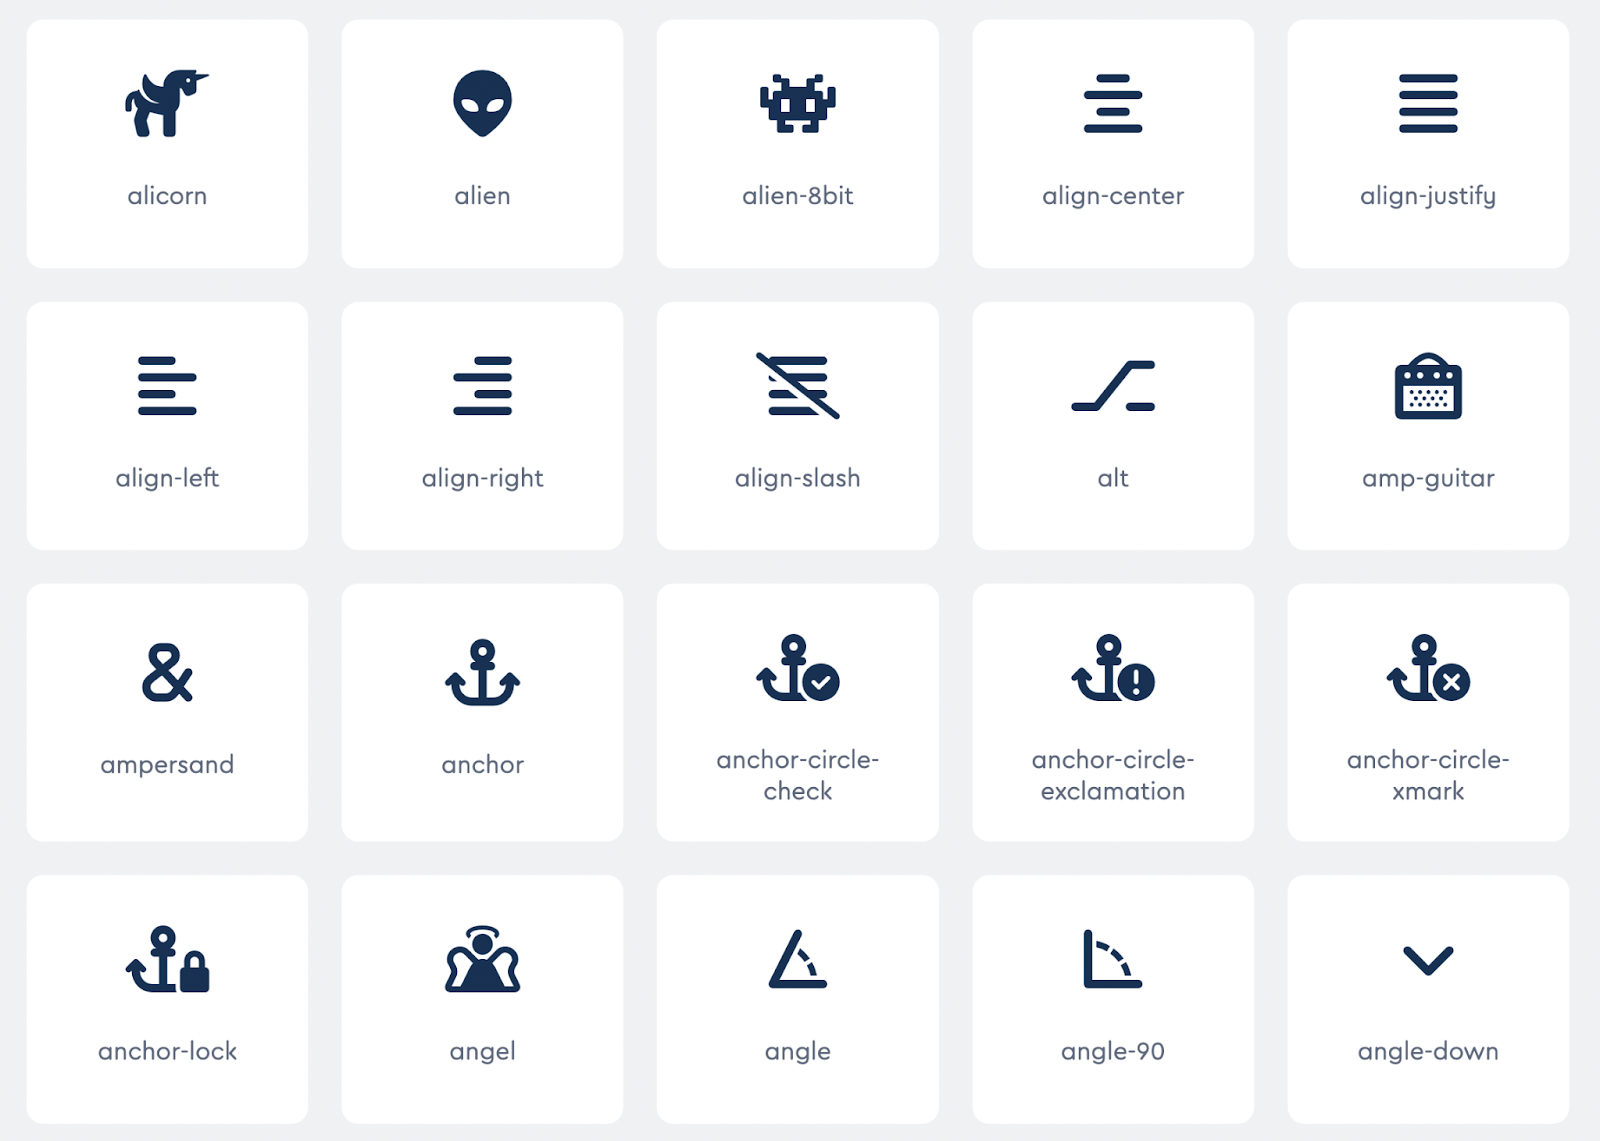
Within each set, you can choose from thousands of icons for almost any purpose you can imagine. You can find everything from a simple checkout cart symbol to a funky alien or an angel!
In the Duotone set alone, there are currently 3,124 unique icons. Moreover, you can easily style your hand-picked icons and even transform them into animations.
Additionally, Font Awesome Pro uses its own “Kits” to optimize icon sets further. When you use these Kits, your site will enjoy various significant benefits.
For example, your site will load faster since Font Awesome caches icon Kits. These fast loading times can help create a positive User Experience (UX).
Furthermore, Kits automatically take care of any compatibility issues with previous tool versions. They also enable you to design your own icons.
Font Awesome’s Pro creations elevate a simple website in minutes, whether you’re looking for simple numbers and symbols or intricate miniature designs. This way, you can impress your site’s visitors with sleek visuals and more easily reach your goals.
How to Set Up Font Awesome Pro Icons in Beaver Builder (In 4 Steps)
Now, let’s see how you can set up Font Awesome Pro icons in Beaver Builder. For this tutorial, you will need the Beaver Builder Pro plugin installed and activated on your WordPress website and a Font Awesome Pro account.
Step 1: Create a Kit
Before you can get started with Beaver Builder, you’ll need to create a Kit. After you’ve signed up for Font Awesome Pro, you’ll be able to log in to your account profile.
From your account home screen, scroll down a bit and locate the Kits section:
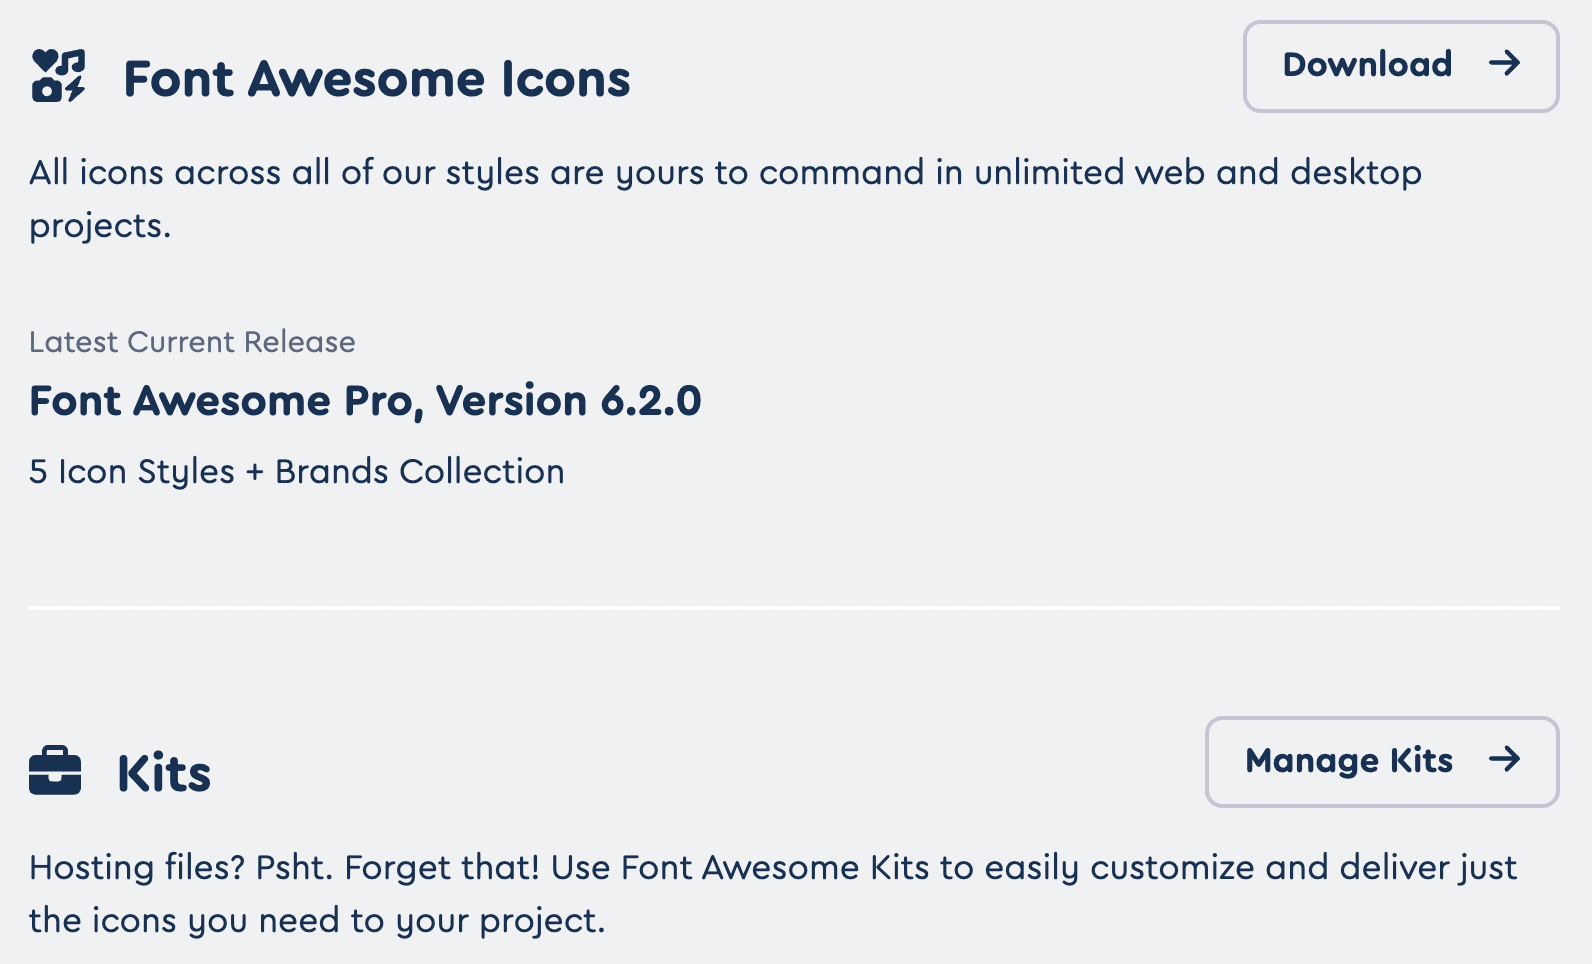
Then, click on Manage Kits. On the following page, hit the blue New Kit + button. This will lead you to your new Kit’s page:
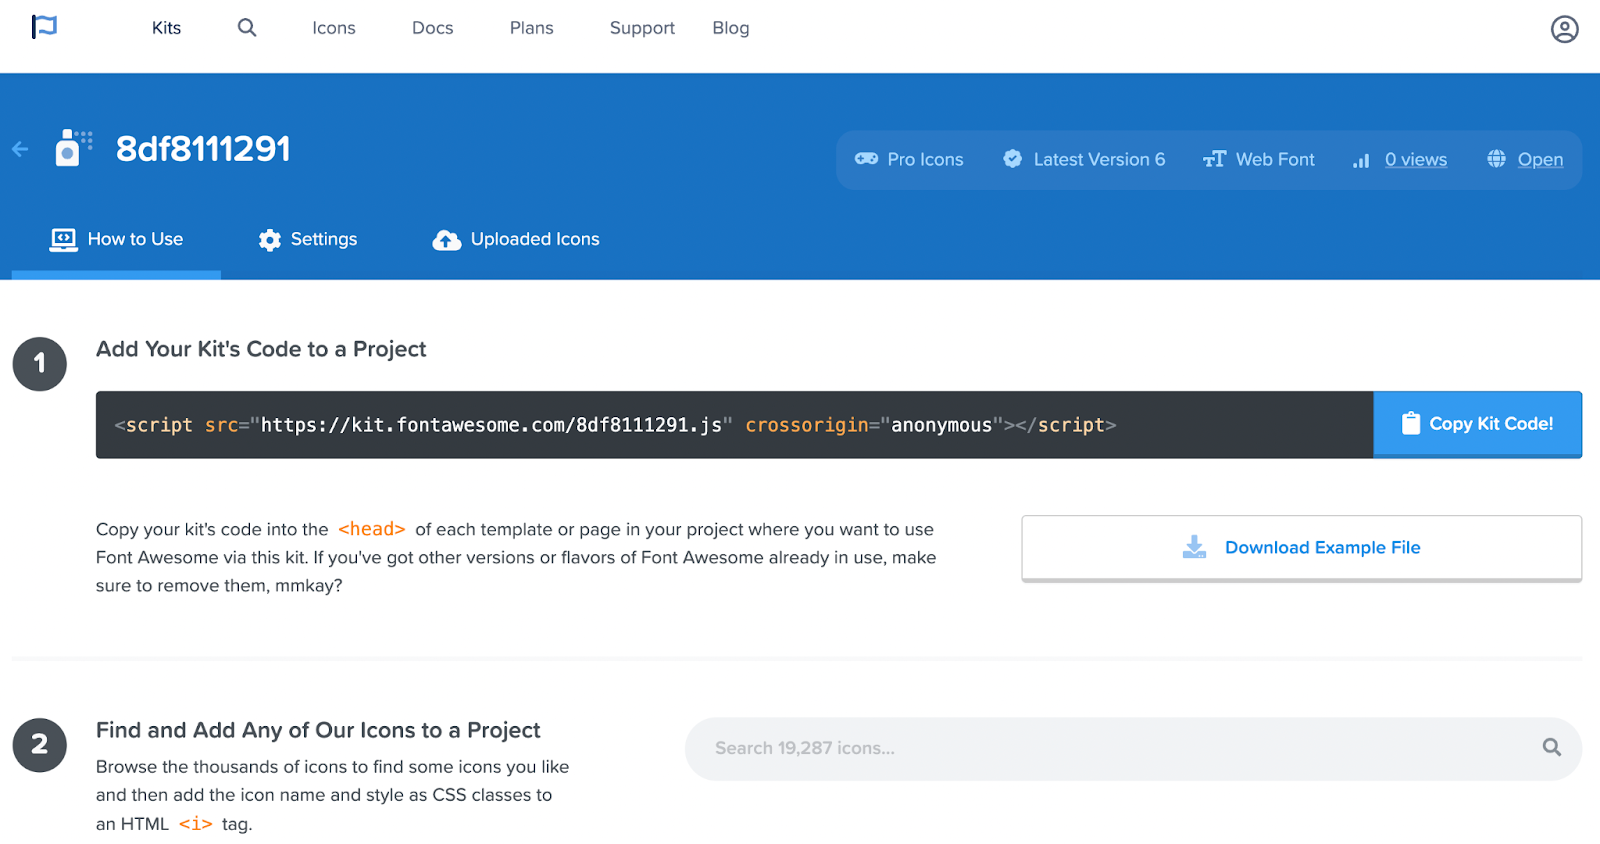
By default, Font Awesome will give your Kit a generic name composed of letters and numbers. To modify this and other elements of your new Kit, navigate to the Settings tab at the top of the page:
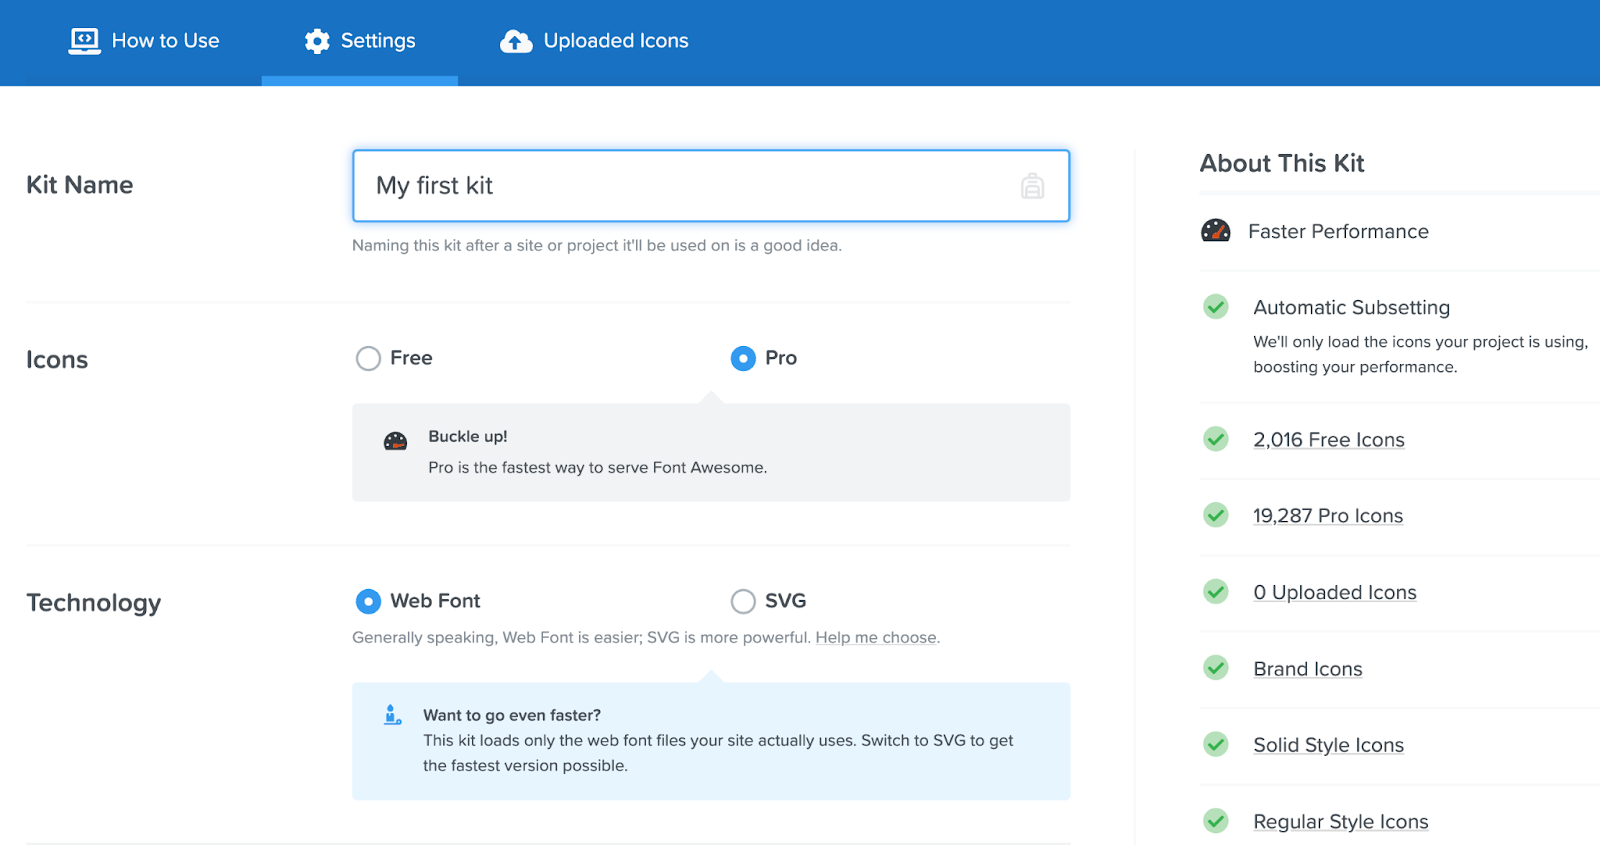
Here, change your Kit name to something descriptive, such as “My first kit.” You’ll also want to ensure that Pro is selected under Icons.
Further down, you can modify the type of technology you want to use (Web Font or SVG). Then, if you keep scrolling, you’ll see that you’re able to limit your Kit to certain domains:
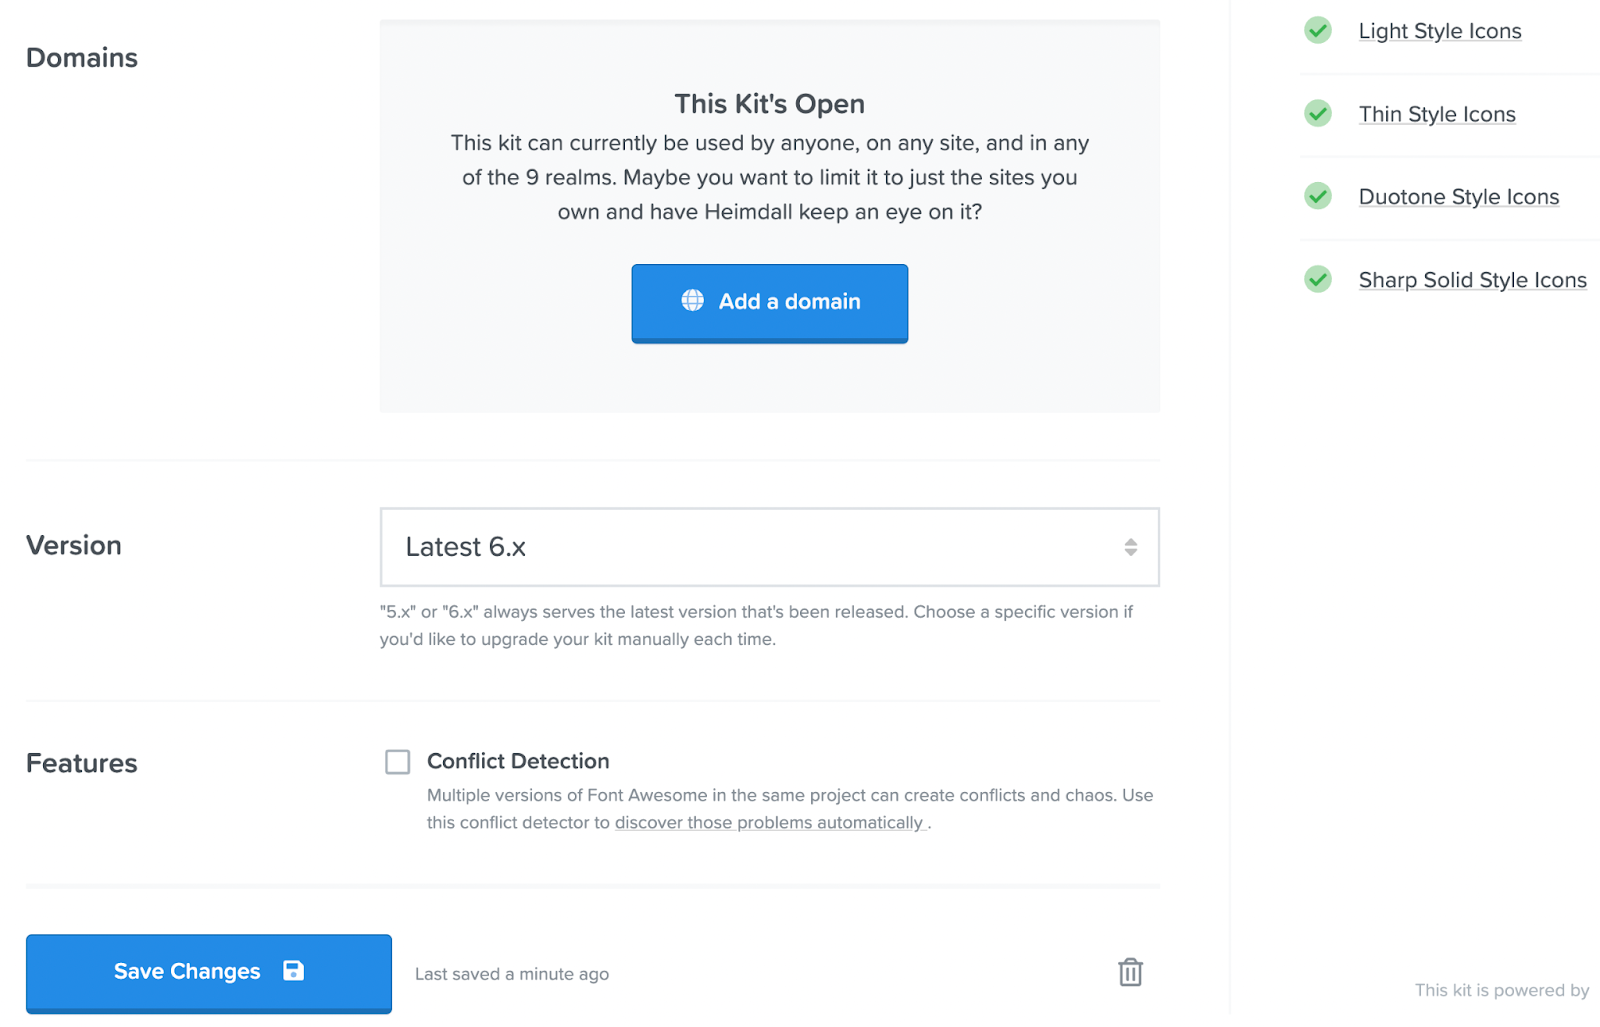
Additionally, you can choose your version and whether you want Font Awesome to detect any conflicts caused when you’re using multiple versions in one project.
We’d recommend using the latest version and opting into conflict detection. When you’re happy with your choices, select Save Changes.
At this point, you can also add your custom icons under the Uploaded Icons tab. Otherwise, you’re ready to move your new Kit to WordPress!
Step 2: Install the Font Awesome WordPress Plugin
To be able to use your Kit in WordPress, you’ll need the Font Awesome plugin:

To start, navigate to your WordPress dashboard. Then, go to Plugins > Add New and enter “Font Awesome” into the search bar:
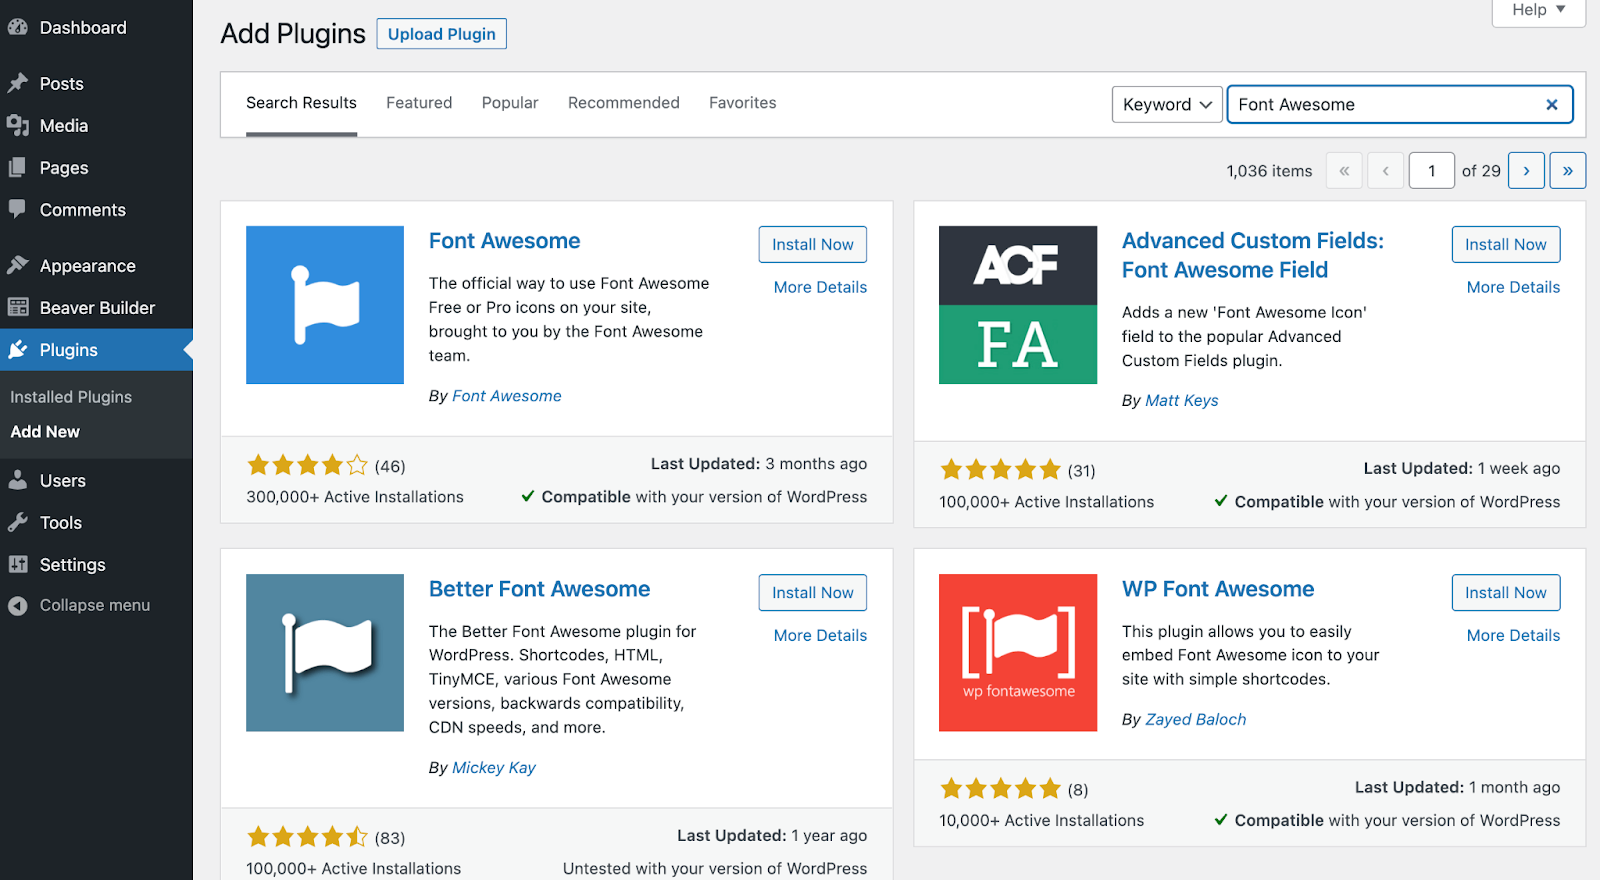
Once you have located the plugin, click on Install Now. Then, select Activate. You should now see Font Awesome in your list of plugins.
Next, go to Settings > Font Awesome. By default, you will see that the tool’s free version is selected next to Icons. Here, select Pro instead:
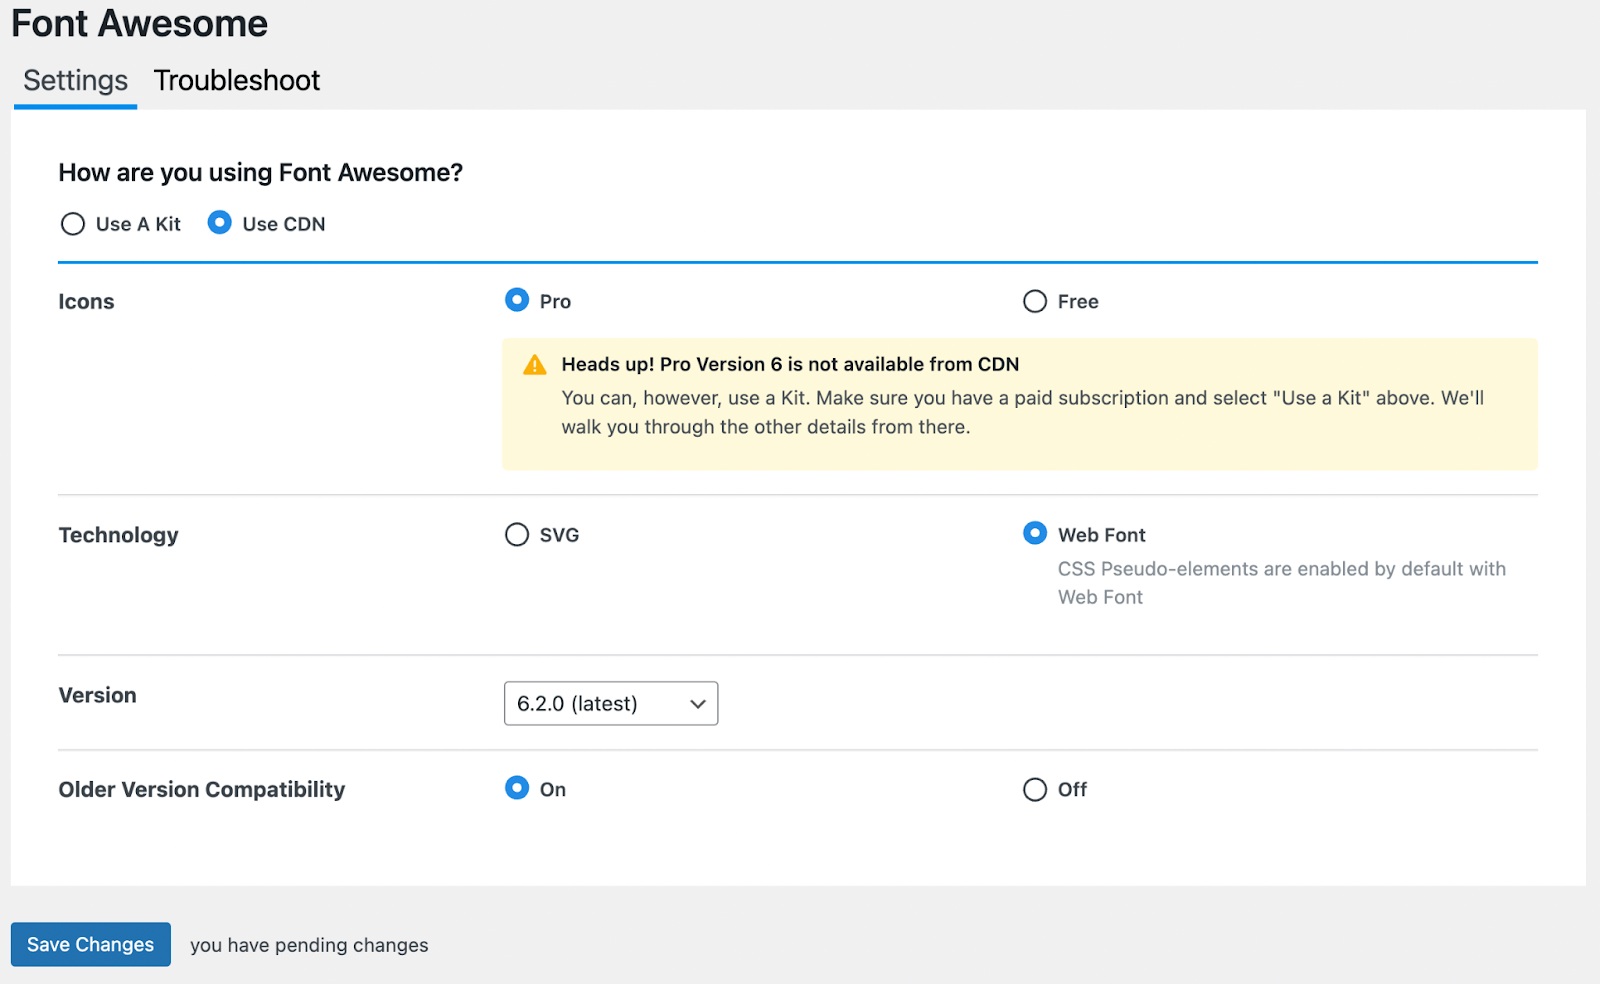
You might now see a warning message that you can’t use a CDN for version 6 of Font Awesome. Don’t worry about this; select Use a Kit instead. You will now be prompted to enter your API Token.
At this point, you’ll need to navigate back to your Font Awesome account and locate this key under the Tokens section of your profile:

Simply copy and paste this into the field in your WordPress dashboard, and then click on Save API Token:
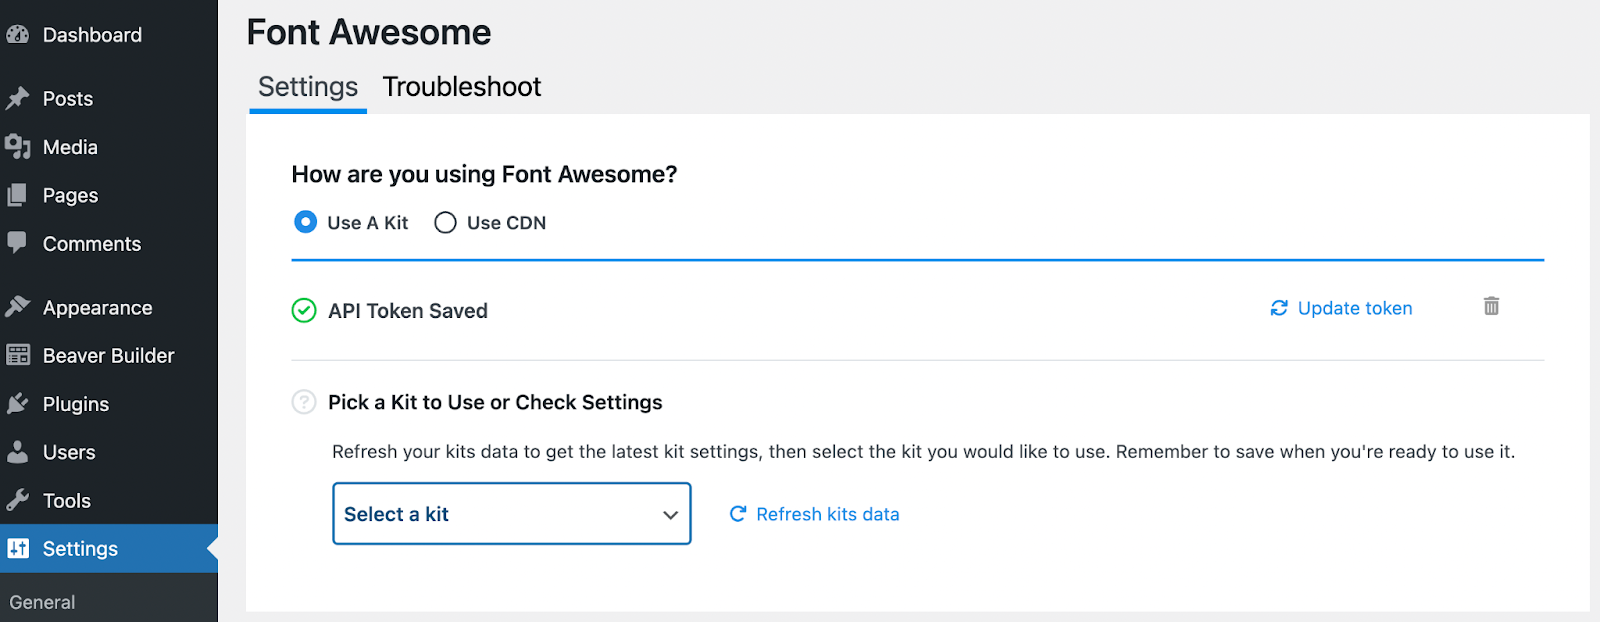
You’ll now see a green check mark if you’ve done this correctly.
Step 3: Add Your Kit and Update Your Beaver Builder Settings
The next step is to add your new Kit to Font Awesome in WordPress. To do this, simply locate it in the Select a Kit dropdown menu:
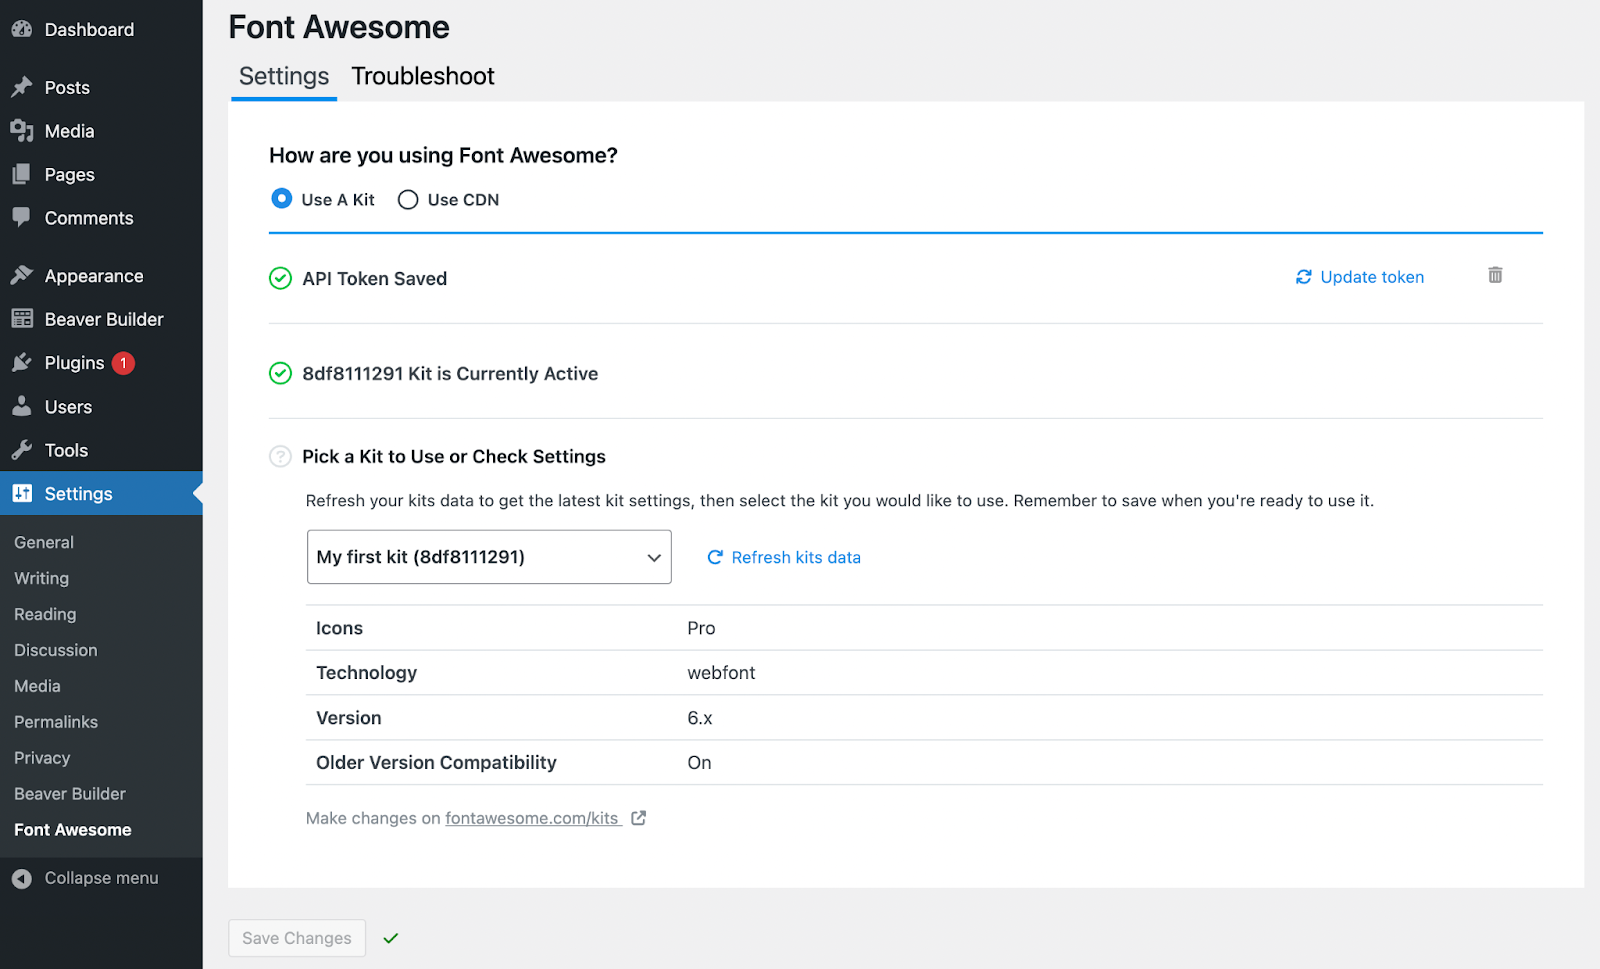
When you’ve successfully added your Kit, you should see another green check mark indicating that it is Currently Active.
Now, all that’s left to do is update your icon settings in Beaver Builder. To do this, go to Settings > Beaver Builder > Icons:
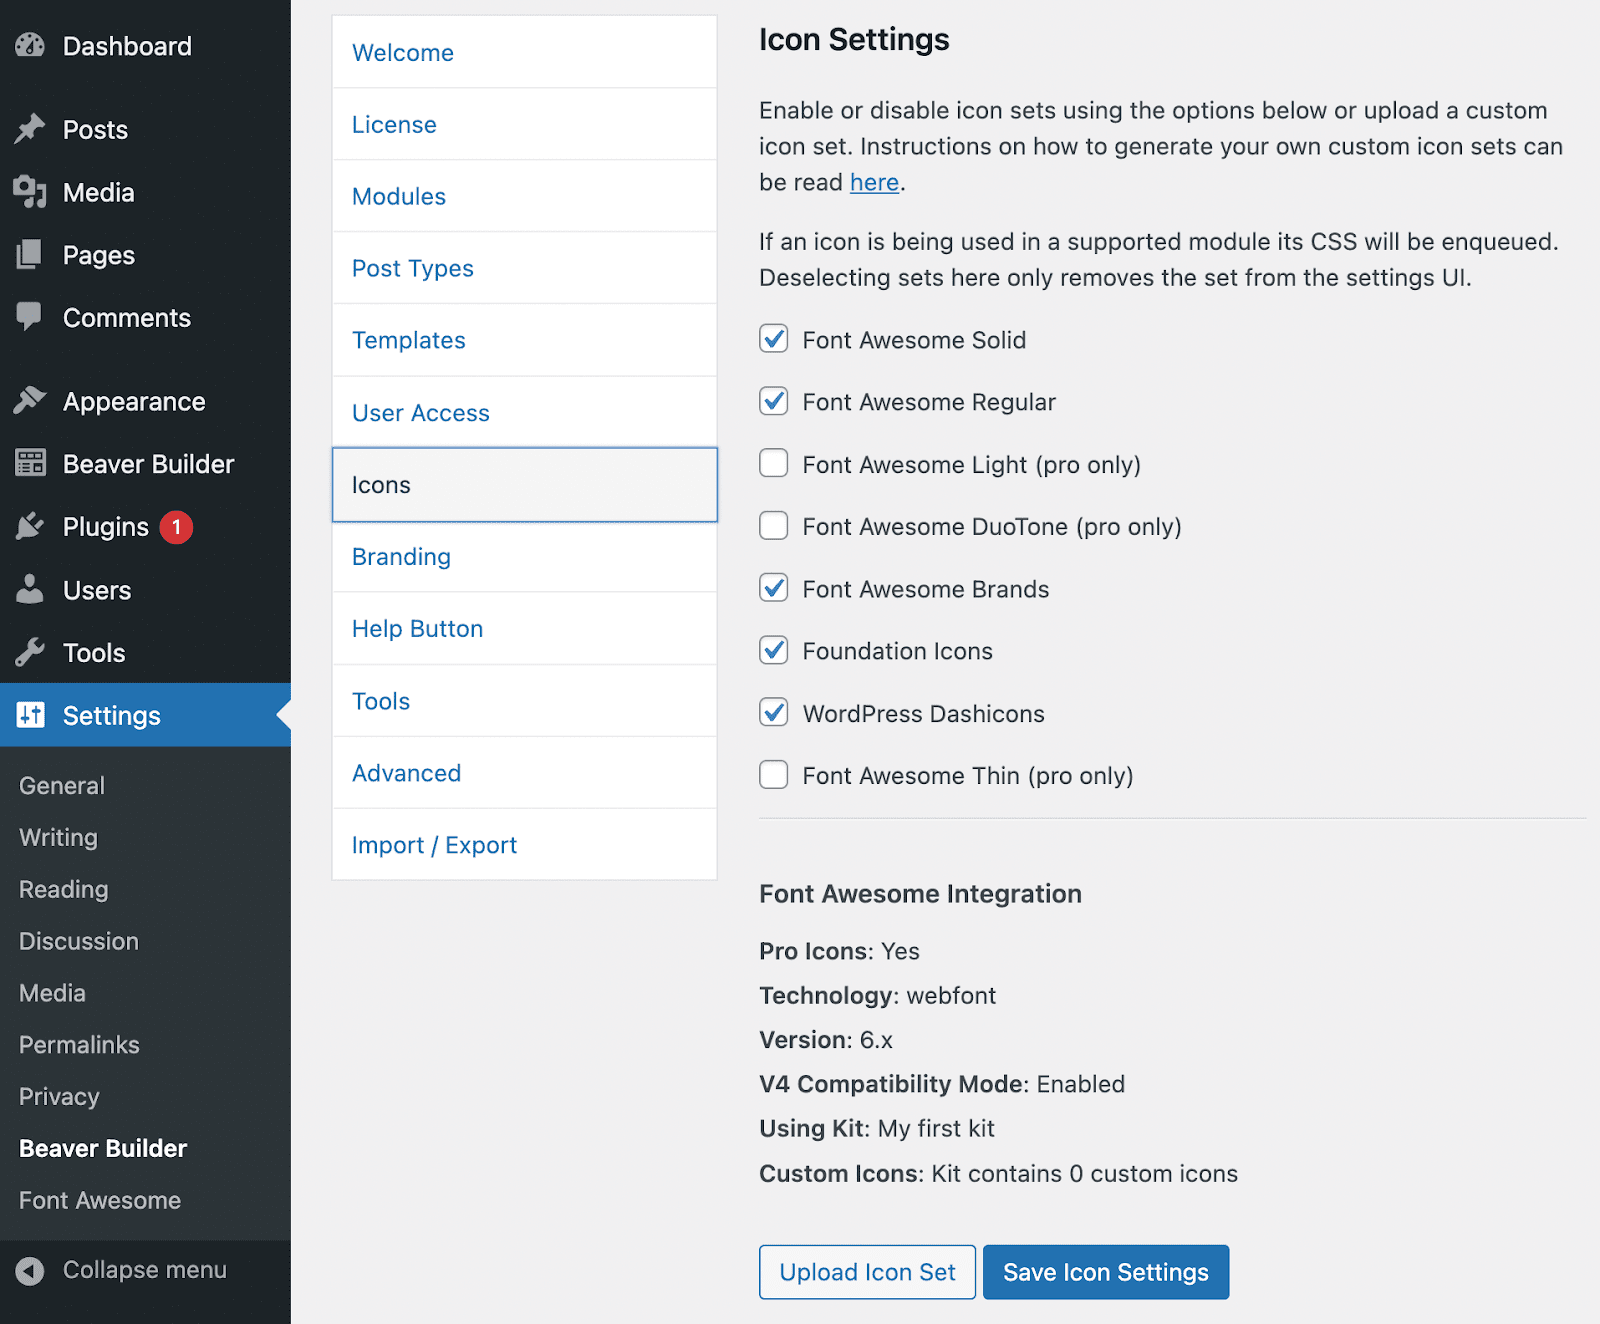
Here, you will see an overview of your Font Awesome settings under Font Awesome Integration. If everything looks good, simply select the Pro icons you would like to use (e.g., Light, Brands, Thin), then click on Save Icon Settings.
Step 4: Customize Your Font Awesome Pro Icons
Now, let’s take a quick look at how Font Awesome Pro Icons can work together with Beaver Builder!
To begin, launch Beaver Builder when you open or create a post or page. In your pop-up menu, select any module that allows icons.
Since buttons are great places to add creative details, we’ll use the Button module for this example. Start by dragging and dropping it directly onto the page:
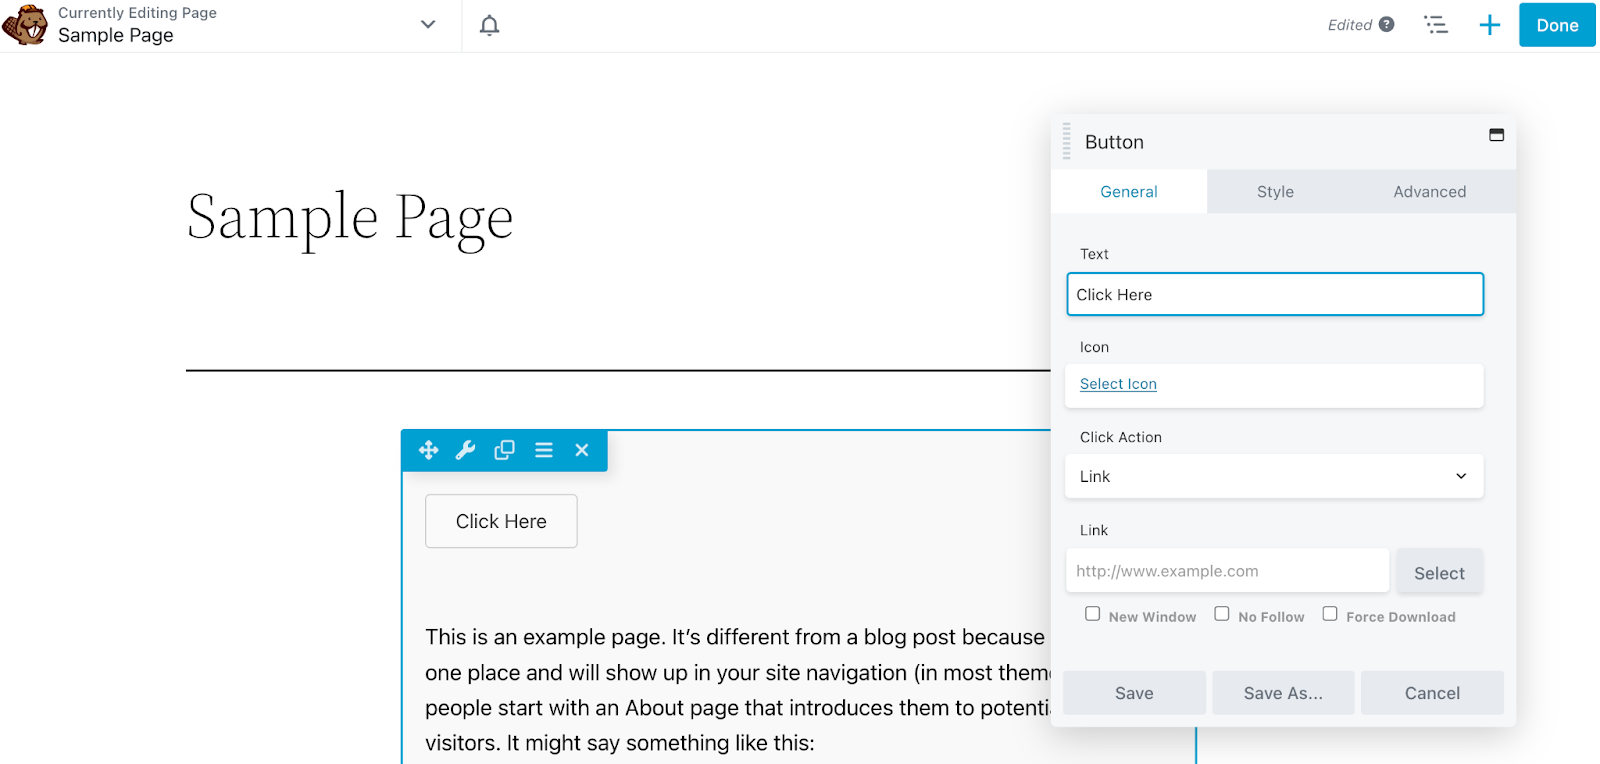
By default, our button says Click Here, but we’ll delete that text altogether and then click on Select Icon in the General tab. This will automatically open an expansive library of Font Awesome Pro icons:
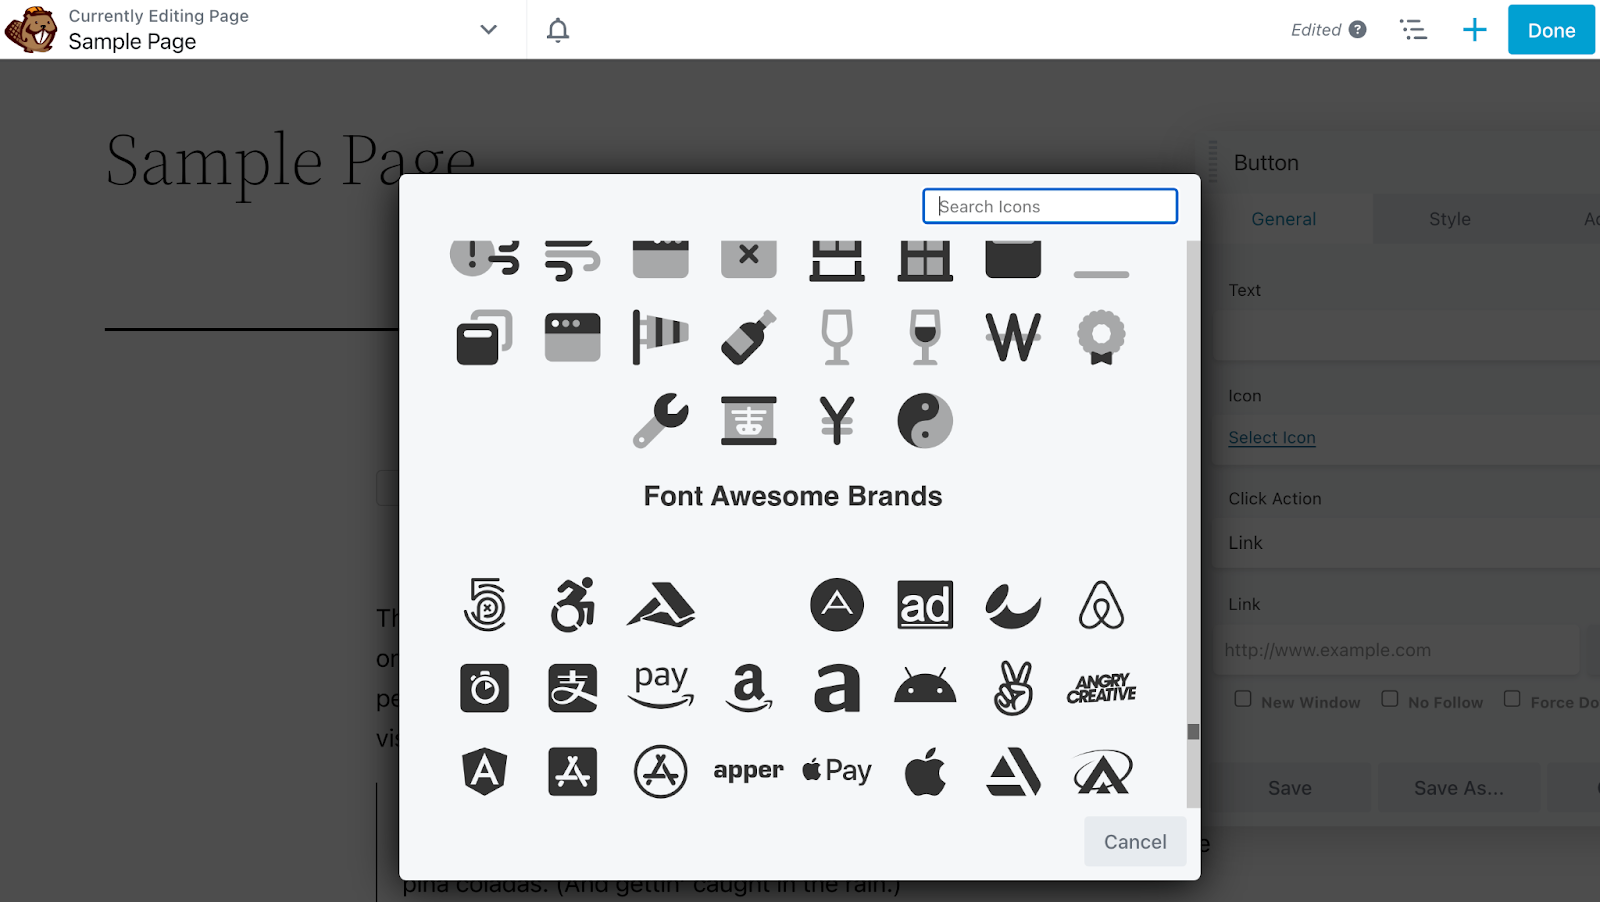
Above, you’ll see our Font Awesome Brands icon choices, but let’s go with a DuoTone Pro icon instead:
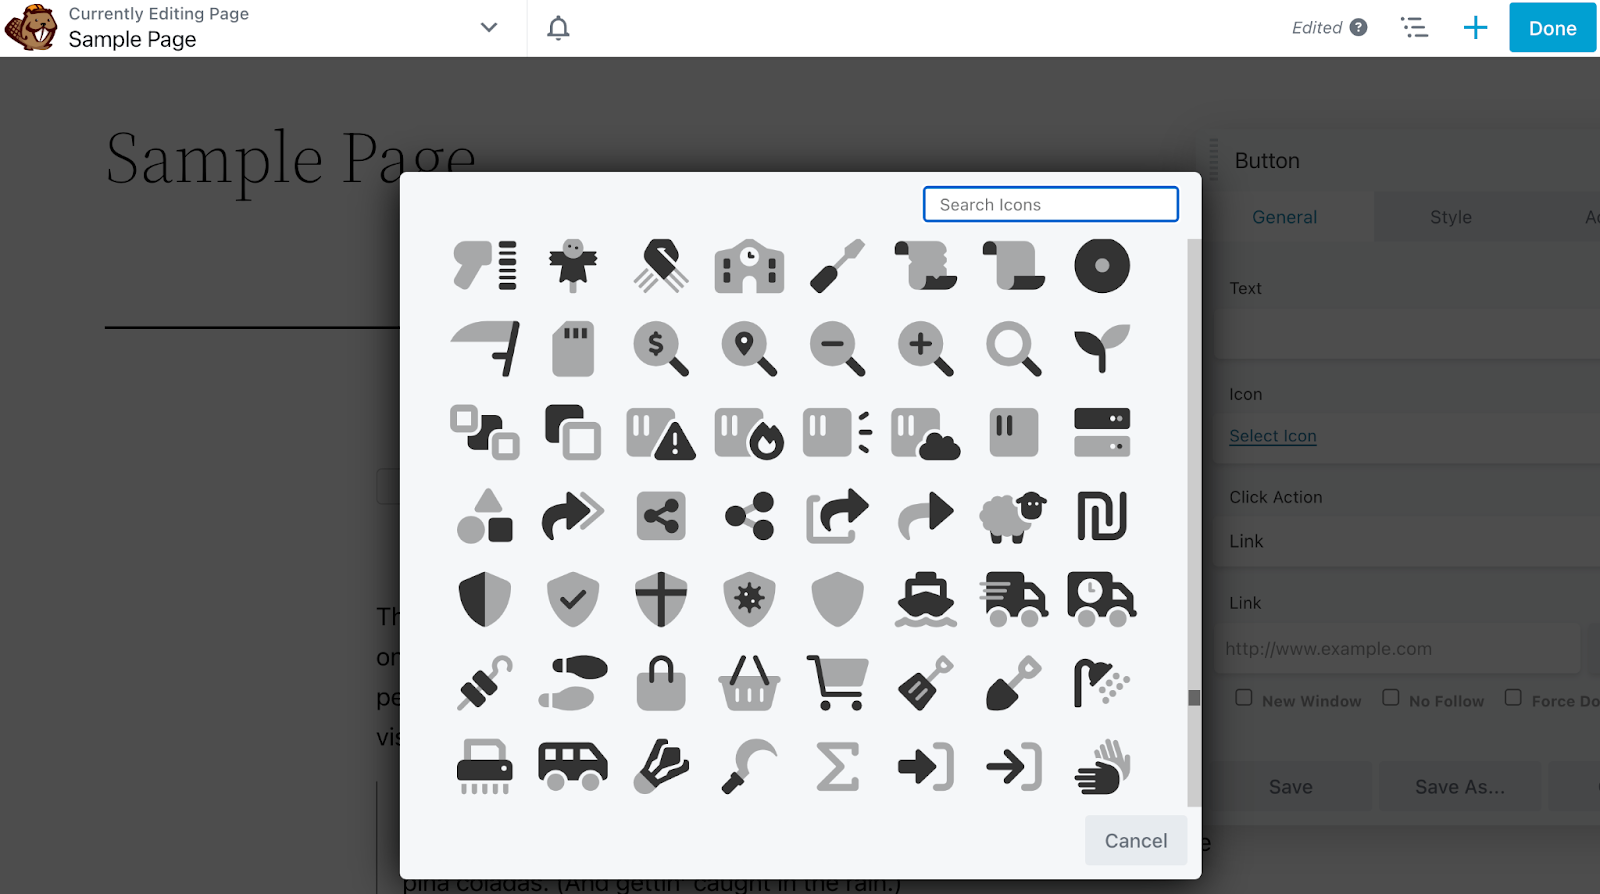
After you add your chosen icon, it should appear on your page. At this point, you can select Save:
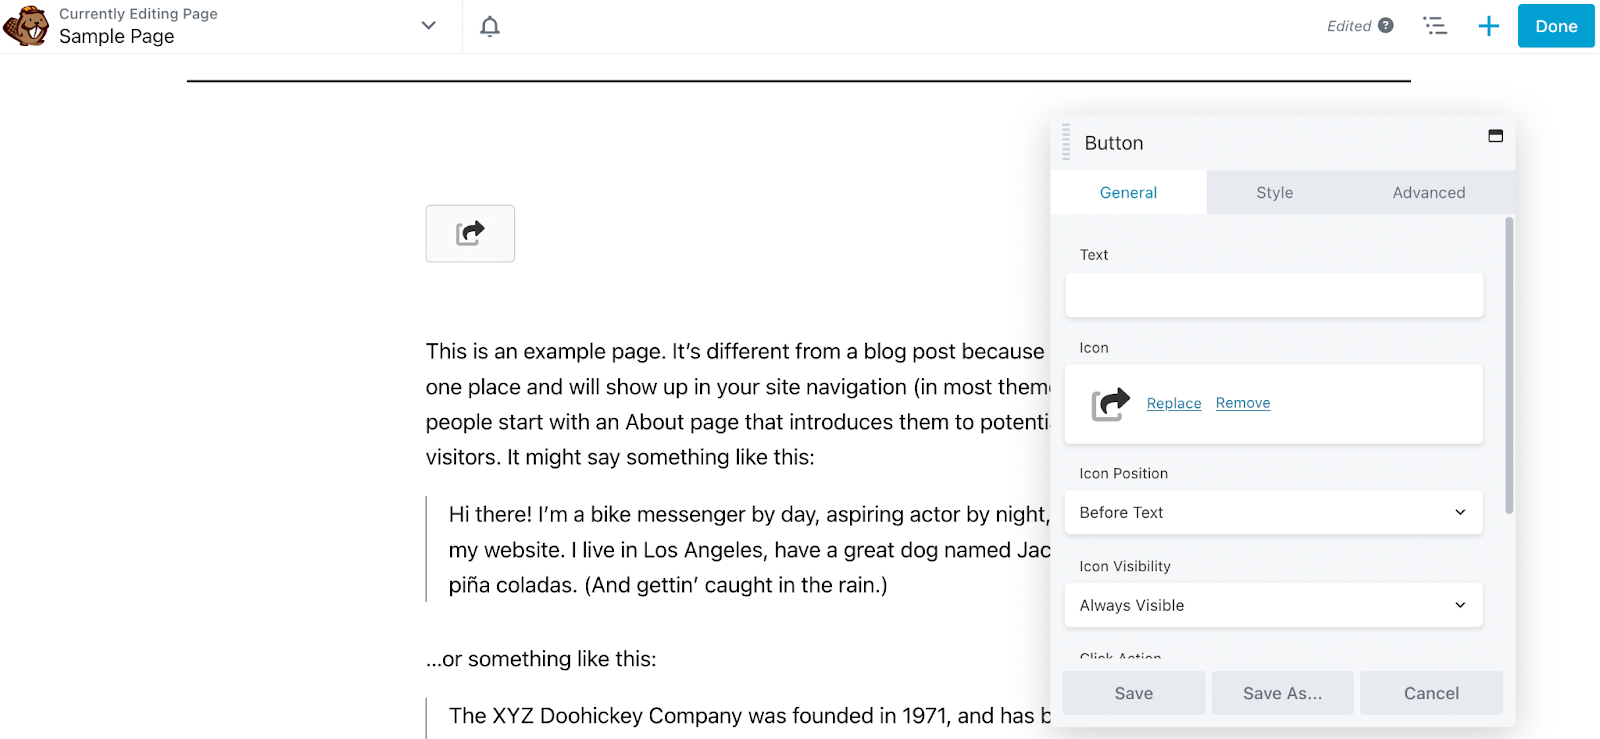
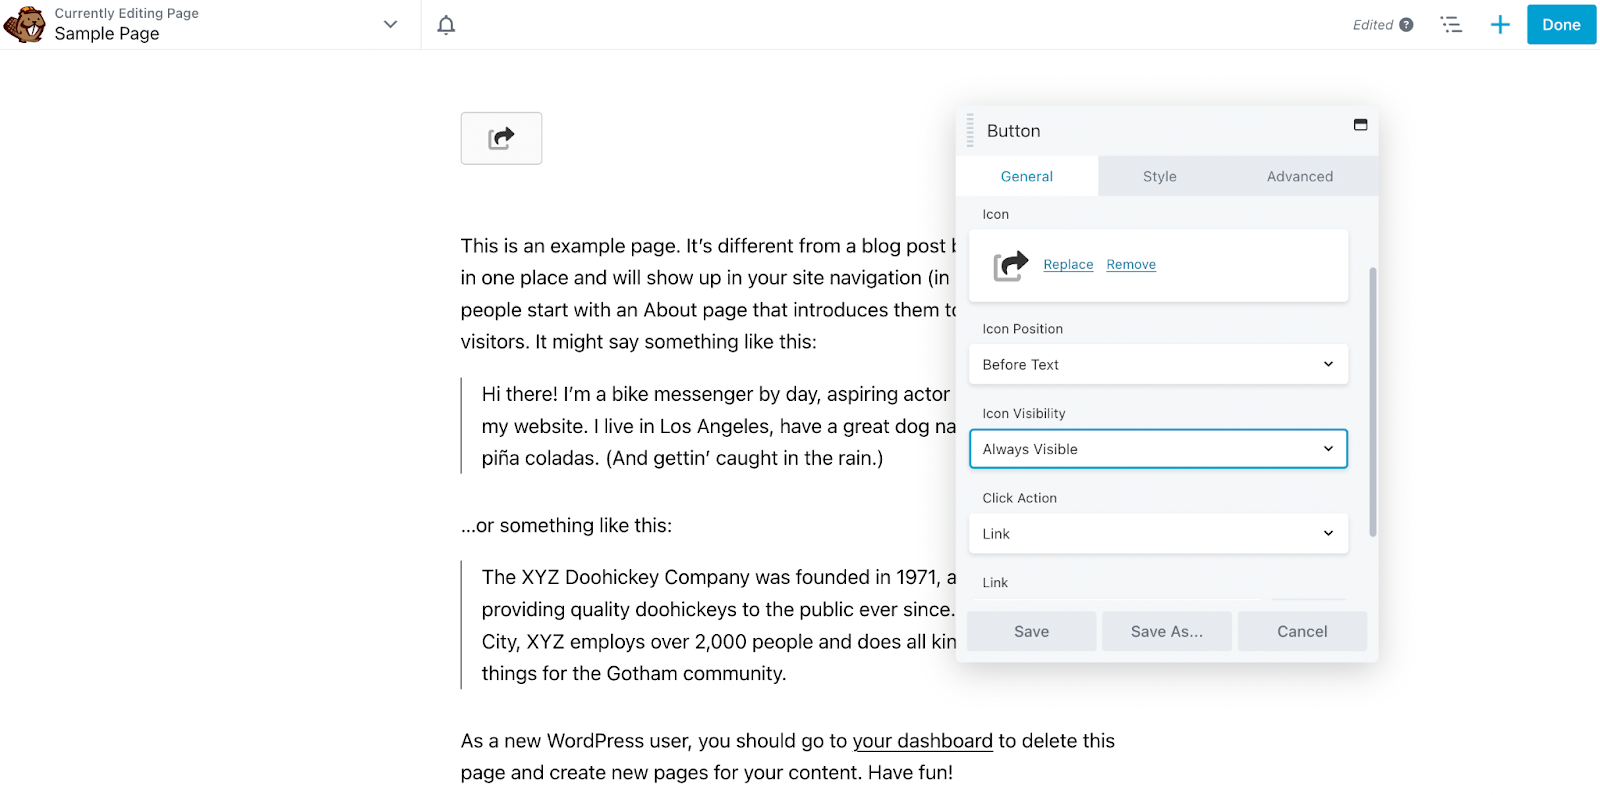
However, if you want to customize your icon further, you can scroll down your General tab to modify its settings. You can adjust the icon position and visibility. Additionally, you can set a click action:
After that, you can navigate to the Style tab to further tweak the appearance of your button icon. For instance, you may want to make it Full Width:
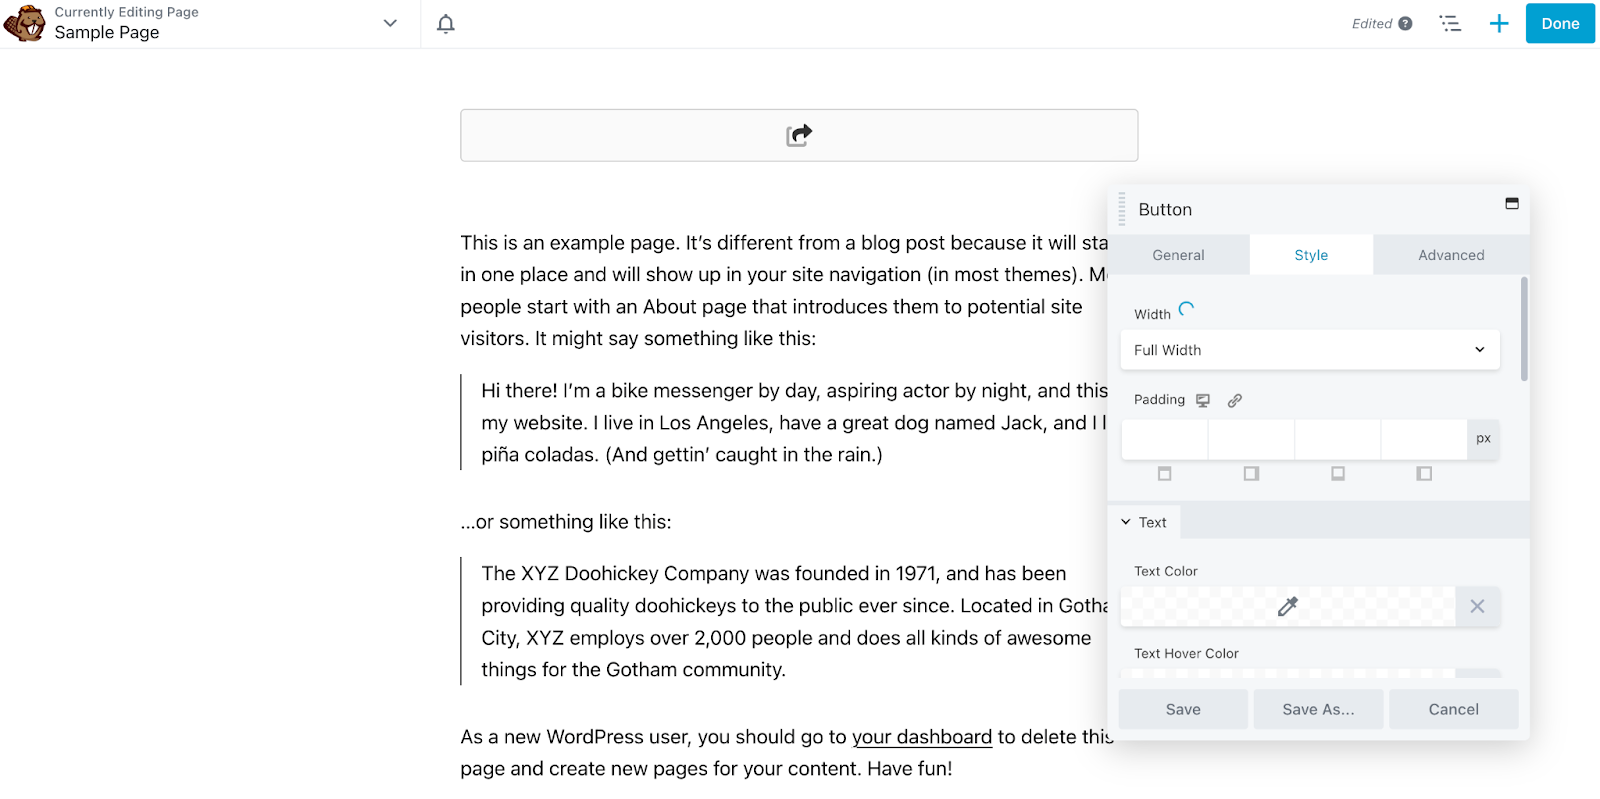
Here, you can also modify the icon’s duotone colors:
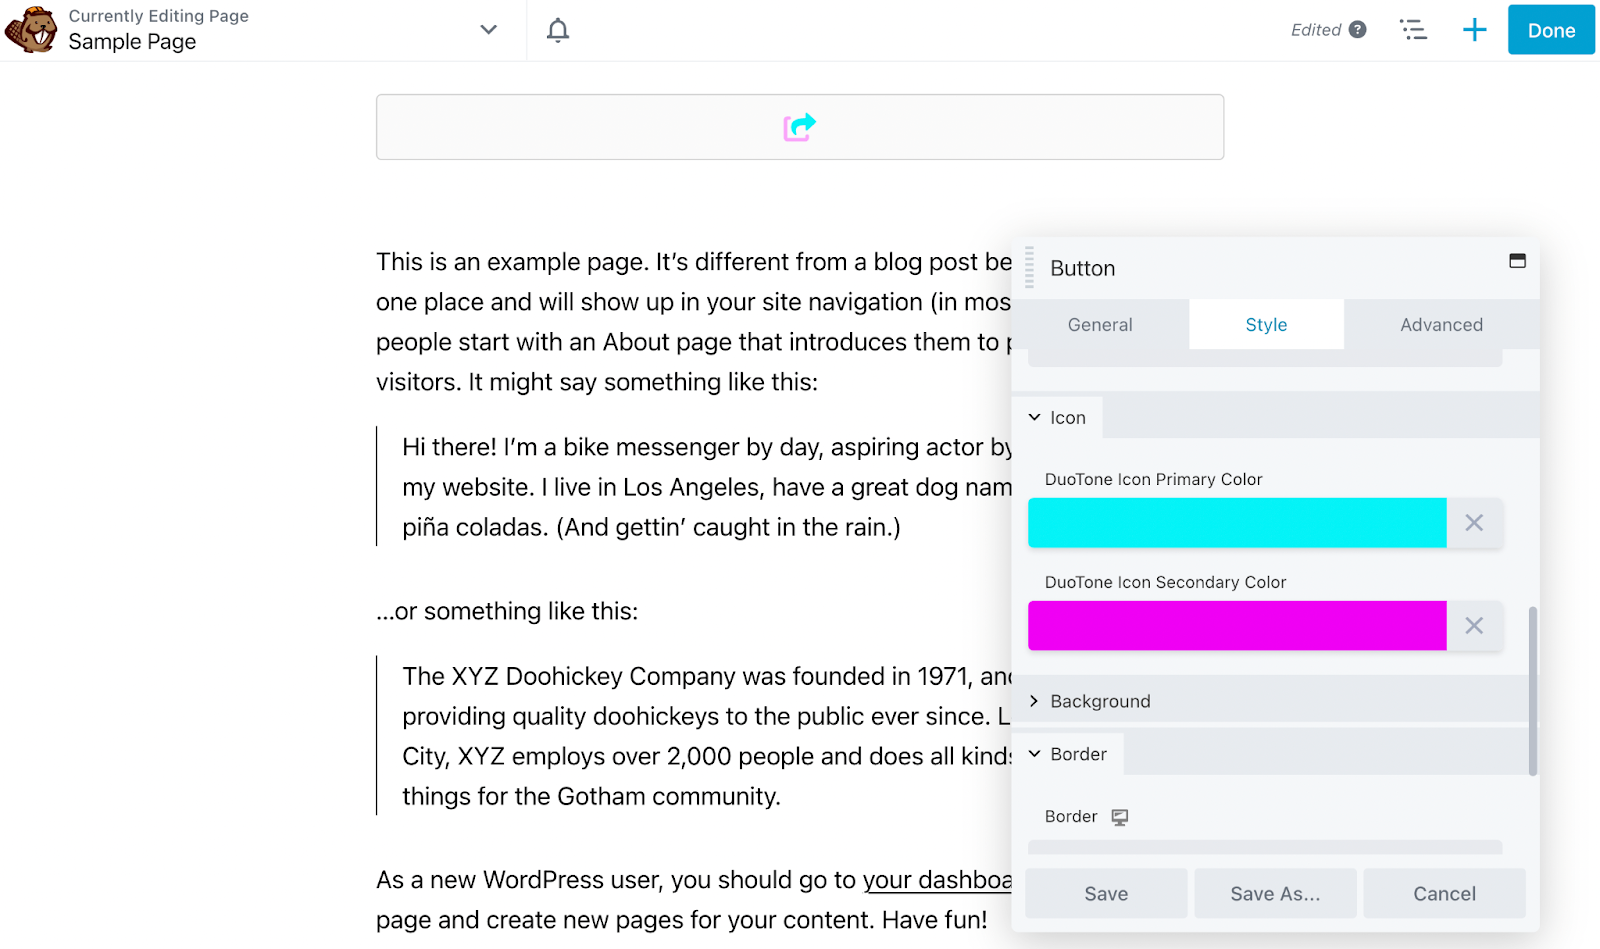
Then, you’re able to alter the button background style and adjust its borders. Under Advanced, you can further tweak subtle design elements such as margins, breakpoints, and more.
Conclusion
Getting started with new WordPress tools can be daunting. However, using sophisticated software such as Font Awesome Pro with Beaver Builder can enhance your site’s design and improve the user experience.
To recap, here’s how you can use Font Awesome Pro icons in Beaver Builder in four steps:
- Create a Font Awesome Kit.
- Install the Font Awesome WordPress plugin.
- Add your Kit and update your Beaver Builder Icon Settings.
- Customize your Font Awesome Pro icons.
